Showing posts with label art. Show all posts

Monday, October 1, 2012

Mani Monday

new segment!  I have become slightly obsessed with nail stamping.  yes....yes i have.
(*i feel husbands eyes rolling as i type)
since i usually change my polish on sunday's, so they are fresh to start the week, i have decided to start doing a mani monday segment.
this week i have two to share.  I did a special mani in celebration of a sweet little girl and her 2nd bday party (if you follow my instagram @ezzimcgee you would have seen the cake i did for her).  she loves the color purple and butterflies....so thats what i did.
I used Sally Hansen "Instant Iris" for the base color.  A purple holo from Milani...sorry dont remember the name...on my ring fingers.  Sally Hansen "Silver Sweep" to stamp with using the BM-307 plate (from the 2012 set).  FYI for you stampers out there "Silver Sweep" is awesome to stamp with - full opacity on dark colors including black.
Last night i decided to change it up for the week and I used Hard Candy's "Beetle" as a base color.  This color is really neat...the name describes it all.  Its a shimmery duelchrome with a black base....in different light and angles you get purple, red, gold and a green black color....hard to capture on my camera.  I stamped over it with Revlon's "24k" using Cheeky 2012 summer plates CH-52.  As you can see this is a good non "special polish" in gold that works great on dark and light colors.
I purchased my plates on Amazon (just search "nail plates").  if you are interested in watching videos i really like "plasmaspeedo" videos on YouTube.

if you want to see more manicure ive done...or possibly ones i wont get around to posting here head on over to my instagram - @ezzimcgee


Monday, September 24, 2012

nail-ventures

its no secret that i love nail polish.  i have a small collection in comparison to a lot of nail bloggers i follow...my hubs would disagree.
i have recently discovered nail stamping....i know i know i guess I've been living under a rock.
what is nail stamping you ask?  well....
2011 Bundle Monster Plates - available here
Cheeky Nail Plate #C - available here
...these are "nail plates" (minus the blue protective film).  They are metal plates with etchings on them in various designs that you put a swipe of nail polish on and scrape the extra off...pushing paint into the image in the process...then pick up the image with a soft rubber stamp.  You then quickly line up the stamp with your fingernail and stamp.
used Sally Hansen Insta-Dry in Pronto Purple and Silver Sweep
isn't that fun?!! it takes some getting use to and practice but its worth it. 
its a super easy way to turning a regular manicure into awesome manicure....and you can tell people "ya i did it myself...how awesome am i?"
if you want to see this done in real time i highly recommend you check out "Plasmaspeedo" on YouTube.  She has many videos that explain how to do stamping and shows differences between the different brands and images they have to offer.
you can also just search "nail plates" in amazon and look at everything...so much fun.
i definitely will be posting more "Nail-ventures" posts here.


Tuesday, April 10, 2012

link lovin


cant remember if ive ever done one of these posts....if i have its been a while.
here are a few things that i have found and like/want/inspire me as of late:
1. this ridiculously cute cat iphone cover that can be found here for about $10. i saw this in one of Kaylah's outfit posts and about died of cute.
(pic source-The Dainty Squid)
2. this quick and easy screen print diy from Calico Skies - great for not so detailed stuff that you may not want to break out the big guns (screen, photo emulsion fluid, etc) for
(pic source - Calico Skies)
3. these really great nebula and galaxy printed fabric available on Spoonflower - check out the fabrics from Corseceng and Tingish shops.  They charge more than i'd like to pay, but you cant find this kind of print just anywhere
4. these really fun and easy painted feathers turned into a necklace by artist Alisa Burke
(pic source - Alisa Burke)
5. these really bright and happy crochet dish towels from Cozy Made Things.  i grew up using knitted cotton dish rags, which can be used for anything really, but not quite big enough for hands and spills.  i love the ripple and chevron crochet pattern and i dont know why i didnt think of doing this sooner....arent they awesome?
(pic source - Cozy Made Things)
usually i would just post a description and a link, but everything i wanted to share was to cool not to post a picture with.  the source for everything is in the caption....spread the love and go visit the blogs i linked (perhaps i should start doing a weekly blog link series? i follow over 100...surely there are some y'all havent heard of)
anything cool you think i should check out?


Tuesday, March 13, 2012

paint by numbers collection

this morning over on Kaylah's blog, The Dainty Squid, she shared her vintage paint-by-number collection so i thought i would post up a pic (not a great one...sorry) so y'all could see my collection.  I've been collecting for a couple of years via thrifting, gifts and ebay.  i have them all hung on one big section of wall in my living/dinning room from floor to ceiling.  every time i add a new one the arrangement has to change.  its like playing a giant game of tetris.  i love all of them!  each one has its own bit of character or story.  ill get some better pictures taken one of these days.
do you have a vintage paint-by-number collection or another kind of collection you want to share? leave me a link and ill pop over and check it out.


Thursday, June 2, 2011

DIY: Free People inspired prayer flags/fun summer bunting

Ombre Prayer Flag Bunting
so this DIY is almost a full week late....or i guess you could look at it as a day early (since i usually do them on fridays)
pic from the Free People Blog
if you follow my blog regularly you know i have mentioned that i like the brand Free People....mainly just for the pretty pictures on their blog, but if i could afford their clothes i would wear them all the time.  i especially like their store design team....always something cool going up in their stores.  so today's DIY is an inspired tutorial on how to make their current
prayer flag-ish displays

i decided to use some spare cotton muslin fabric i had used as temporary curtains and do a dip-dye (ombre) technique on the fabric strips.  if you dont want to do any dying then you can cut up old clothes or t-shirts and skip ahead to the end.

1.) cut up your fabric...they dont have to be the same size.....just long enough to tie onto your clothes line and blow in the wind.  i cut my fabric approx. 1"x10" ....some strips were skinny and some were fat and definitely not cut in straight lines.  once they are cut soak them in warm water so your dye will bleed nicely

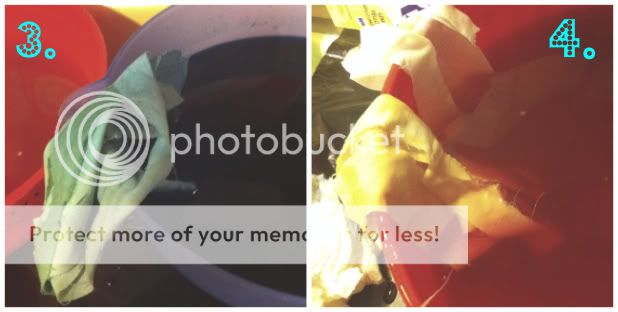
2.)  mix your dyes according to the package instructions.  i used the RIT powder dyes because it was cheaper and i was buying several colors.  i used some big popcorn/utility bowls added the powder and hot water (*notice the trash bag underneath the bowls....it kept my kitchen counter very clean!) wear your gloves or your hands will be colorful for days!!
3.) gather a group of fabric strips and fold the whole bunch in half. 
          >if you want the ends of the strips to be the darker part of the ombre effect - submerge them about halfway in the dye and let the rest (folded part) hang over the side of the bowl.  since they are wet they sort of cling and hold themselves in place, but if they fall in then fine....its not supposed to be super perfect.....imperfection is beautiful.  this is the basic ombre technique.
         >if you want a two-tone ombre effect - submerge the whole cluster of fabric strips in your lighter color (ex. green) and leave til you get your desired color saturation.  then submerge only the ends in the darker color (ex. blue).  since the fabric is wet the colors will blend nicely!

4.) mix it up!!  play with different colors and combinations.  make some lighter and some darker.  its your call....have fun with it
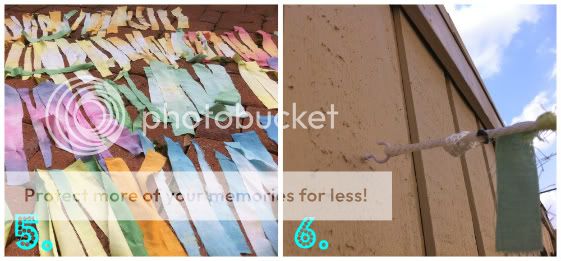
5.) once you have all of your fabric dyed and rinsed in cold water (to set the dye) hang your strips out to dry.  when i did this it was very hot (as always) so i just laid mine out on the brick of my patio...they were dry in under an hour.  Aren't those colors so pretty?  Now all you have to do is tie them on to your clothesline with a square knot....i spaced mine about 2in from each other. 

6.) put up some hooks with the screw threads on the end (i used a nail to make a pilot hole with).  at one end of your line tie a looped knot and hook it.  i zig-zaged my line across my patio......once i knew how long to make it i cut my line and tied another looped knot on the other end.  (tip: if you use an acrylic clothesline, like i did, you should burn the cut ends so that it won't unravel itself - for natural fiber rope use some hot glue on the ends so it won't unravel).

yes, i have knitta tagged my bike...i will finish one of these days
 isn't that fun? now if i want to have a patio party all i have to do is run some twinkle lights along my line for some great ambiance.  for more fun with ombre dying check out an awesome DIY on Hontestly WTF - they do an ombre dye job on some denim shorts or my favorite stylist Kris from Glitter 'n Glue .

dont forget to share your pics!! i wanna see what you create

Wednesday, February 9, 2011

our luv quilt

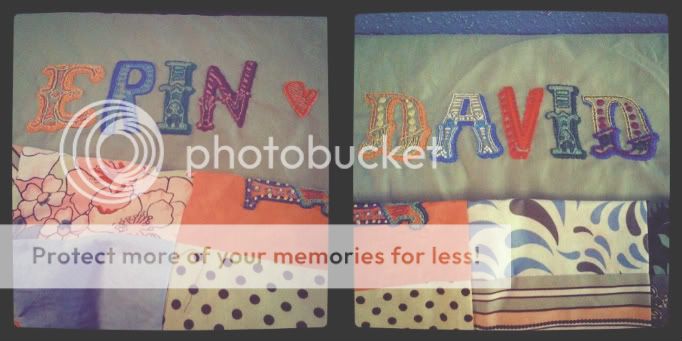
geez....ive been working on this "luv"quilt for a while.  i got everything cut and pieced together pretty quickly over the summer, but then i decided to take it a step further and embroider some of our little quips and inside jokes on the solid squares.  that took a while but not to bad.  then i decided not to stop there and embroider our names on the quilt back in a very complex mixed font.  what was i thinking?  each letter takes forever....and several months later we have this...
its kind of hard to see all the detail...but let me tell ya...its there.  each letter took anywhere from 3-5 hours each.  but it is beautiful so i dont mind that much.  now i just need to sew everything together and do some quilting.  as a side note....most of the fabric i used for the quilt is recycled from stuff i already had or from goodwill.  ill show you the finished product whenever i get it finished.

Monday, January 24, 2011

weekend thrifty finds...and a Monday DIY

this weekend was the first, in about a month, that i didnt have a cake due or somewhere to be.  so i took most of the day to myself and went thrifting.  i usually dont go with a list, but this time i did.  i was on a mission to find candle stick holders (sturdy ones that could hold platters), vintage or pretty platters/plates, and pretty crystal/glass vases.  we dont even have a date set for the wedding but i know what i want for decorations so there is no reason i cant get started. 

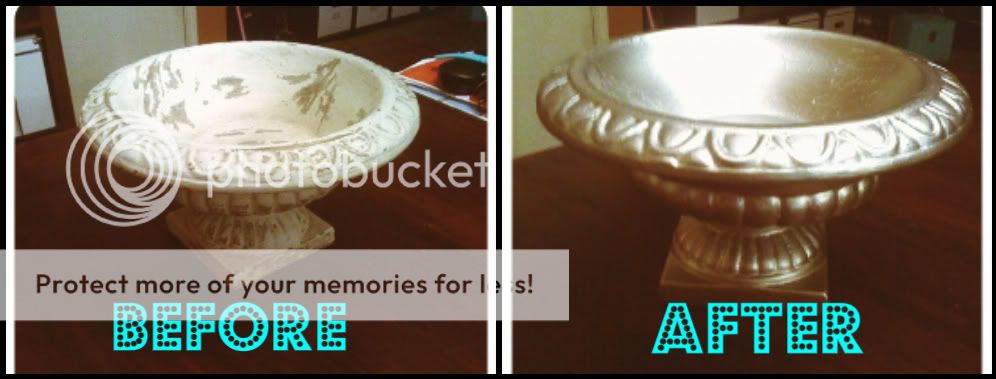
i found 4 candle stick holders (3 are brass and the other is wood), a ceramic urn(?), 2 glass bud vases, set of 6 mini cognac glasses that will work great as tea light holders, set of three gold-yellow serving platters (one round and two oval), a couple of vintage floral pillowcases, and a partial set of vintage Mikasa daisy stoneware.  ill post pics of everything later, but for now i wanted to show you how i made over some of my thrift finds.

first up is the wooden candle stick holder i bought:
this poor pillar candle holder was hideous. 
 it was brown and black with silver accents, but it was all scuffed up and sad.  sorry i forgot to take a pic before i started spraying..alittle trigger happy.  i gave it a good shot with some Krylon Silver spray paint and it looks awesome!

next up is a ceramic urn.
as you can see, on the left, it was artfully "distressed" for lack of a better word...all in all it was pretty ugly.  so i did the same thing as i did with the candle holder....gave it a nice good shot of silver Krylon.  it looks a million times better....looks even better in person.

i also did the same metallic spray treatment to some empty wine bottles. 
i used different shades of metallics for some depth.  i think with taper candles and flowers in our wedding colors (oranges and greens) it will look nice as centerpieces on the tables.  i got this idea from Once Wed - Milk and Honey feature (see wedding idea post from last week)

im going to submit my before and after pics to Project Restyle (which is being put on by Elsie Flannigan and Rachel Denbow of Red Velvet Art.  You can follow their Flickr stream and see other submissions.

Feel free to try this yourself.  I would love to see your pics!


Friday, January 21, 2011

all work and no play....newest cakes

ive been absent for about a week.  constantly working, even on weekends, has taken a toll.  im exhausted....my eye twitch is back....and i think these dark circles have become a permanent fixture on my face.  but all my work has resulted in a couple good cakes.  its been a while since ive put some cake pics up so here ya go

this was a baby shower cake a friend of mine asked me to do.  the plate on the left is what the them was for the party....and on the right is my interpretation of the plate in cake form.  it was a vanilla cake with strawberry preserves and sweet cream filling.  i think the little palm tree hanging off the left side of the cake is cute.

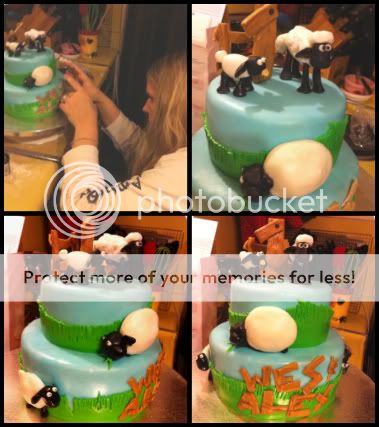
next up is my twin cousin's 1st birthday cake....based off the British show Shaun the Sheep (done by the makers of Wallis and Gromet...and is available on Netflix instant)!
i think it came out pretty good!  dave's help was invaluable to me on this one.  he made Shaun and the little baby on the top, as well as the big'en aka "Shirley."  he did such a great job on making them look like they do in the show.  i dont know if you can tell from the pics but there is a #1 on top that look it was formed with two boards.  Shaun makes stuff really fast in the show so i thought it would be fun to make it look like Shaun made a number one as well as the boys names out of wood.  this cake was chocolate with chocolate filling and the top teir was organic lemon cake with lemon curd and sweet cream filling.  everyone seemed to like it....so i declare it a success.

thats all for now but ill be back later today with more entries. 

Monday, December 13, 2010

what a short....but full weekend

this weekend i had a cake order for a new client (one who will bring me a lot more business).  the cake requested was a "Gucci duffle bag with money coming out of it."  its kind of an odd order....especially since it was for a man's birthday celebration.  but i decided its better not to ask.  so thats what the majority of saturday was.....making cake look like Gucci.  here is a pic of the bag that the client sent me.....
and this is what i was able to come up with:
the lighting in my kitchen makes the pictures look really yellow (not helped by my vintage "harvest gold" countertops).....but i think i did a good job.  i only painted a few Gucci logos....i did them by hand and there was no way i was going to paint hundreds of them.  it was strawberry flavored cake with big chunks of strawberry pieces baked in, filled with my famous sweet cream icing.

also this weekend....i picked up my custom mucho mucho bueno bueno key necklace.  i believe last week...or maybe the week before Brandi posted on her blog that she was taking custom key necklace orders for the holidays.  i already have, and love, my anchor key necklace from her.....so i jumped at the chance to get mine and my fiance's name on a key. 
dave and i stoped by Brandi's salon on saturday (yea for being close and not paying shipping!) to pick it up....and its awesome!!  Thanks so much Brandi !!!
im so happy she was able to do the tree design.  maybe, after we are married, when we add kids to our little family we can add more keys to our family tree! Brandi....don't stop making keys

thats all i got for now.  ill be back later with xmas wishlist and other fun things!


Monday, December 6, 2010

cake orders from last week

this past week i did an order of custom cupcakes with hand painted "diva toppers" with piped "24s."  they were vanilla cupcakes topped with strawberry preserves, fresh strawberries and white chocolate sweet cream frosting. 

i also had a baby shower cake for a sweet friend of mine, erica.  she is doing an orange nursery theme for her lil boy....and she also has a love for owls.  so i based the cake on the invitation which had a mama and baby owl on it and very simple/angular trees.  it was dark chocolate cake with raspberry and chocolate filling.  

i think they turned out pretty good and my customers were pretty happy....so i declare them a success.  what do you think?

xoxo
-erin

invitation love

i am absolutely in LOVE with Rifle Paper Co. (Anna Bond) and her beautiful custom wedding invitations.  unfortunetly, i could never afford her custom invitation suites but man they are so lovely and very fitting to my personality.  i mean just look.....


there are more wonderful pictures of her custom work on her website if you want to check out more from Rifle Paper Co.  She also makes beautiful birthday invitations, greeting and special occation cards. 

since our budget would never allow such pretties....and i have pretty good artistic talent i might try and make an invitation suite inspired by this wonderful artist.....not copy....but inspired by.  i like the very simplistic and unique style.....very charming.  ill show you sketches when i have time to get some ideas together. 

xoxo
-erin

Wednesday, November 10, 2010

tombstones, owls and a belly

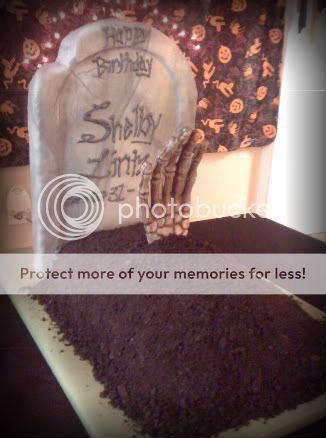
it occured to me that ive done a few cakes in the past couple of weeks and i hadnt showed ya'll yet....sorry about that.  about a week or so ago (halloween) i made a birthday cake for the lovely miss. shelby, a halloween baby.  she requested a halloween themed birthday cake for her costume party.  so i decided to make a tombstone and grave cake.  i think it turned out pretty cool....she loved it!
the cake was a red velvet cake with cream cheese frosting, then coated in oreo cookie "dirt."  the tombstone was a giant rice crispy/crunch berries treat, that i carved to look like a tombstone, and then covered in a marbled fondant.  and of course,you cant have a grave cake with out a skeleton hand coming out.....shelby totally dug it....she was comparing her hand to it to see if it was accurate....so funny.

next up was my good friend erica's family baby shower cake/cupcakes.  they wanted a smallish preggy belly cake and cupcakes with an owl theme.  so this is what i came up with.
Mocha cake with sweet cream filling
Photo courtesy of Sara Van Buskirk
gumpaste tulips turned into owls (hey you gotta make due with what you got sometimes)

Gumpaste owls and leaves, hand piped with royal icing
Photo courtesy of Sara Van Buskirk
 
I think everything turned out ok....what do you think? ive been pretty busy with cakes recently, which from a business standpoint is great, but at the same time I have a full time job in addition to my cakes and its tiring.  I love making cakes...each cake is unique and different and presents new challenges.....which is one of the main reasons i am drawn to do them.  if you haven't checked out my website already i would love to have you visit http://www.littlegreenboxshoppe.com/ or click on the portfolio tab at the top. If you live in the Houston area and are interested give me a call!


xoxo
-e