Tuesday, November 16, 2010

its good to be reminded from time to time...


i complain every once in a while about not having enough money or not having the nicest things, but i try and remind myself that i am truely blessed to be where i am and have what little i do have. 

we are coming up on Thanksgiving.  what are you thankful for?

xoxo
-erin

Thursday, November 11, 2010

meet my new winter coat

this is a totally not going to be an interesting post but i wanted to share because im excited about it.  last weekend old navy was having a big coat sale and i scored myself a beautiful white wool duster/trench peacoat. 
isnt it lovely?  plus who could complain about getting a $90 coat for $45? no one thats who.  on top of all of that it fits like a dream.  usually i find coats that fit ok....the arms are usually too short or wonky in the chest and shoulders....but not this time.  the cut is perfect.  i also bought a white knit beanie to wear with it.  i wish i had bought the red fedora i found last year...it would look awesome with this coat.

now if it would just get cold outside.  the high today in Houston 75....thats with no sun.  the high for tomorrow.....85.  eww.....just plain wrong for mid November. 

whats your winter wardrobe looking like? anything fun?

xoxo
-erin

Wednesday, November 10, 2010

tombstones, owls and a belly

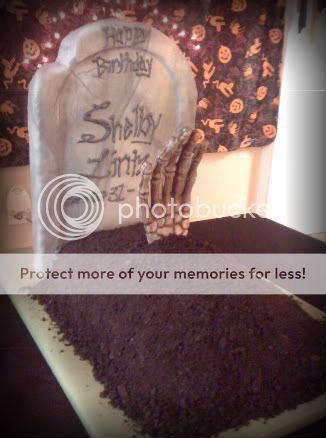
it occured to me that ive done a few cakes in the past couple of weeks and i hadnt showed ya'll yet....sorry about that.  about a week or so ago (halloween) i made a birthday cake for the lovely miss. shelby, a halloween baby.  she requested a halloween themed birthday cake for her costume party.  so i decided to make a tombstone and grave cake.  i think it turned out pretty cool....she loved it!
the cake was a red velvet cake with cream cheese frosting, then coated in oreo cookie "dirt."  the tombstone was a giant rice crispy/crunch berries treat, that i carved to look like a tombstone, and then covered in a marbled fondant.  and of course,you cant have a grave cake with out a skeleton hand coming out.....shelby totally dug it....she was comparing her hand to it to see if it was accurate....so funny.

next up was my good friend erica's family baby shower cake/cupcakes.  they wanted a smallish preggy belly cake and cupcakes with an owl theme.  so this is what i came up with.
Mocha cake with sweet cream filling
Photo courtesy of Sara Van Buskirk
gumpaste tulips turned into owls (hey you gotta make due with what you got sometimes)

Gumpaste owls and leaves, hand piped with royal icing
Photo courtesy of Sara Van Buskirk
 
I think everything turned out ok....what do you think? ive been pretty busy with cakes recently, which from a business standpoint is great, but at the same time I have a full time job in addition to my cakes and its tiring.  I love making cakes...each cake is unique and different and presents new challenges.....which is one of the main reasons i am drawn to do them.  if you haven't checked out my website already i would love to have you visit http://www.littlegreenboxshoppe.com/ or click on the portfolio tab at the top. If you live in the Houston area and are interested give me a call!


xoxo
-e

Wednesday, November 3, 2010

10 things about me

 1. i am a Harry Potter nut....no really.  i cant even count how many times ive read, listened, and watched the books/movies.  im totally geeking out over HP7P1 movie....less than 20 days!!

2. i heart yarn, knitting, crocheting and yarnbombing....what can i say...i got it from my momma

3.  i make custom cakes and cupcakes....visit my website at http://www.littlegreenboxshoppe.com/

4. i collect tin lunchboxes....i have around 100 now...give or take a few

5. i love feathers and all things native american....my fam has indian blood somewhere down the line.  but i mainly just find it very beautiful and natural
6. i was a hippie in a previous life....i dont really believe in that sort of thing....i just really love the mellow/natural/flowy style

7.  i heart tattoos...it was always a dream of mine to be a tattoo artist....maybe one of these days
8.  ive collected hello kitty my whole life....i cant help it she is too dang cute.  i dont have nearly as much stuff as some people ive seen on the internet.....i limit myself to a few things here and there.
9. i dont like donuts....i know thats weird...but i just cant eat them
10. i have the most amazing boyfriend....whom i loves very much

thats all for now.  i will from time to time post other "10 things about me" episodes. all photos, except dave's, are from weheartit.com 

xoxo
-erin 

Friday, October 29, 2010

friday DIY: homemade hot/cold pack

winter is on its way....which, for me, means achy joints and cold toes (yes im in my twenties and my joints hurt real bad when it gets cold).  heat packs also feel really wonderful on sore muscles and, for my ladies, cramps.  this was the case last night when i got home from work.....i was feeling achy and decided to have a poke around through my craft closet and managed to find everything i needed to make a heat pack.  so i thought i would share it with you.....

DIY: Homemade Heating/Cooling pack

Supplies:
-fabric
-scissors/rotary cutter
-sewing machine, thread
-iron
-uncooked rice/beans/buckwheat/split peas


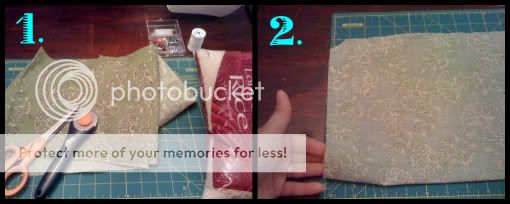
1. Cut out your fabric to desired size.  I doubled the size I wanted so i could just fold my fabric in half and only stitch around the edges. 

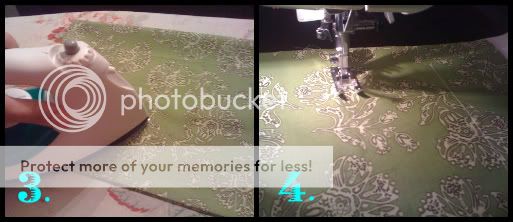
2.  With wrong side of fabric up (right sides together on the inside) stitch around your edges leaving about 1.5in opening on one side.  Trim your corners off, careful not to snip the stitches, so that when you turn it right-side out the corners will lay nicely.

3. Once you've turned your pack right-side out give it a good iron.....making sure that your seams, corners and material is nice and smooth

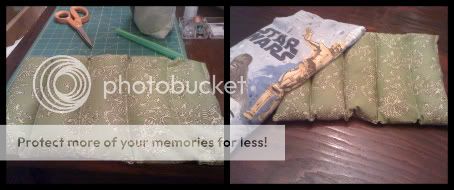
4.  Now your are going to topstitch "compartments" in your un-filled pack.  I stitched 4 lines evenly spaced leaving about 1.5in from either side of the pack (that way the rice move freely from compartment to compartment)....if you cant picture what im talking about here scroll down and look at the finished picture to see how i did the compartments.

5. Fill your pack with uncooked rice/beans/split peas/buckwheat (a funnel would be handy here...but i dont have one so i used a rolled up piece of paper).  Whatever you use to fill your bag be sure that it can hold up to being put in the microwave.  I used rice because that's what i had in my pantry (I have also heard you can use cornmeal).  This step took the longest because you have to maneuver the rice into the compartments....which can be tricky depending on how big your pack is and how you've oriented your compartments. DONT overfill your pack...you want a little wiggle room in the pack/compartments.

6. Once you've filled your pack to your liking stitch up your opening.  I just topstitched it a couple times....you can do a invisible stitch but im not good at it and i didnt want to chance my rice escaping.....plus who's going to see it and really care that much? no one.

Your done! I had enough rice left over (from a 5lb. bag) to make a second smaller one with no compartments. 

How to use:
-place your pack in the microwave (be sure your turn-table is clean!) and heat for about 1-2min....and enjoy
-to use as a cold pack....place in the freezer for a few hours....enjoy.
-depending on how often you use your pack you may want to occasionally empty the rice and replace with new


I hope this tutorial was helpful. 
Happy Halloween friends

xoxo
-e