Friday, July 30, 2010

ive been sick


sorry ive been away all week...ive been under the weather and havent had much heart to write or post anything. it all started sunday evening when i was going from extremely hot to extremly cold...I took my temp and sure enough i was running a 101 fever. Needless to say this week has been all about recovering. I will be back either tonight or tomorrow with a full sized blog post....I owe you a Friday DIY and a Shake Weight Challenge Update.

Sunday, July 25, 2010

Baby Shower Cake


I had a baby shower cake due today. I based the cake off of the invitation and a sample of the linens they were going to use today. I tried for the first time today the "French Embroidery" technique on the cake....where you use royal icing and brush it so it looks like the vintage french porcelain vases....well thats the general idea anyway. i think i did a pretty good job....but im sure i could use some more practice. Let me know what you think.


cute huh?

ive got some more stuff to post later.....stay tuned.

xo
-e

Saturday, July 24, 2010

Happy 150th Birthday Alphonse Muncha


I am..always have been...in love with ART. I dont think there was an art class offered that i didnt take....that includes Art History (which i got a minor in in college). One of my favorite art periods is Art Nouveau....mainly because of Alphonse Muncha. To me he made the era. You can see his influence in many other Art Nouveau artists as well as in architecture. If you love Muncha and architecture you need need need to go to Paris. Ive been twice and everytime i was there i found myself looking at the Art Nouveau architecture rather than the "Paris-y" things (for example: the Metropolitain entrances. I love vintage french advertisements and posters (these are my favorite things to do reproduction paintings of)...i have many many books of nothing but vintage advertisements....and i gotta say my favorites are Muncha's...they are just to beautiful not to love. Here are some of Muncha's art.


looking at all this art today is making me want that Muncha sleeve tattoo even more...one of these days i might cave...but i need to find an incredible artist first....anyone know someone that could do Muncha justice?

Friday, July 23, 2010

Friday DIY: Vinyl Record Bowls

for this weeks Friday DIY i thought i would show ya'll how to make bowls out of old vinyl records. i have quite a few that i use around the house to hold keys, spools of thread, bottle caps, spare change, etc. i have also used them as a creative means of gift wrap...think along the lines of a gift basket, but use the vinyl record bowl instead of the basket. anywho....moving on


Supplies: Oven, baking sheet, metal or oven save bowl, pot holders, and a vinyl record. I bought my records at Half Price Bookstore...you can usually get them for really cheap. (Pointer: dont use your mint condition Beatles albums people...i look for ones in the $1-2 range that are scratched up and wouldnt play anyway...or ones that have pretty stickers in the middle)

Step 1: Heat your oven to 200F....its not very hot. Move your rack to a higher level so that the record will be close to the coils without catching fire...keep in mind the height of the bowl you are using.

Step 2. Once the oven is hot place your heat safe bowl upside down on the baking sheet (tip-slip a wooden spoon under one side of the bowl so you can pick the bowl up easily with your oven mitted hands). place your vinyl record so that the hole in the middle is in the middle of the bowl.

Step 3: Put in oven. Let it heat up for a couple of minutes....you should see the vinyl droop over the bowl (Please excuse the splatters in my oven...i bake alot..and it doesnt clean easily)


Step 4: pull everything out of the oven. you will have only a few seconds (approx 20-30)to take the record off the bowl

Step 5: flip the bowl and the record over. put the record into the bowl to help you mold it in the right shape.

Step 6: if you dont get the way you want the first go-round...no worries...repeat steps 3-5 until you are happy with your shape. remember this is supposed to be functional art...so imperfect is just as pretty as perfect

Step 7: beautiful...look what you made. if you want you can cut a round piece of clear contact paper and "seal" the sticker on the top and bottom to preserve it. i didnt do it here because i didnt have any on hand.

Note: there is no way to completely waterproof a vinyl record bowl...do not put in dishwasher or microwave. clean with a damp towel only...if you have not sealed your sticker do not get it wet. Save the sleeve! I'll post another fun DIY project that will utilize the record sleeve...and give you a unique art piece for your wall.

Thursday, July 22, 2010

I saw this post on The Kitchn and had to re-post it here...enjoy

There's nothing terribly original about pouring beer over ice cream; if nothing else, root beer keeps us reminded of that tradition. I've been lazy with my beer and ice cream pairings — who isn't? — and so it wasn't until recently when a guest brought over a bottle of super-sweet Framboise Lambic, a raspberry beer of sorts, that I gave some serious thought to pouring boozy brews over ice cream.


So while the dinner guests were mixing their crimson red beer with Prosecco, I fell into a lambic float daydream.
Lambic is a Belgian relative of beer, but not exactly a close sibling. It is made in open vats where things are allowed to go wild. The result is a cloudy beer, only mildly carbonated and with a sour taste. Many lambics are brewed with fruit, bringing in sweetness to balance out the sourdough-like flavor.


The most widely available brand of lambic is Lindemans. They make a cherry (Kriek), raspberry (Framboise), apple (Pomme), black currant (Cassis), and peach (PĂȘche) lambic. All are great over a scoop or two of vanilla (or other) ice cream, but my favorite is the cherry, and that was dessert last night. Perfect for a hot summer evening. I'm sure it's not bad in cooler seasons either.

Lambic Float
serves one

1-2 scoops vanilla ice cream
4 fluid ounces (1/2 cup) lambic

Place a scoop or two of ice cream in a glass. Top with the lambic. Serve immediately with a spoon.

ive not tried this yet, but i have had lambic before and let me tell you its delish....so there is no way that this would not be even better. guess who is making a stop at kroger on the way home...me!!

xo
-e

UPDATE --> so i tried this when i got home today and it was delish. i had to buy the framboise (raspberry) flavor because the kroger didnt have the cherry or any of the other flavors. really really yummy...i would recommend it!

two bottles of wine and a bowl of pasta

i hang out/eat dinner with two of my favorite girls at least once every month....and its always a good time. last night we meet at Collina's Itallian Cafe...and i gotta say it was pretty good. the cool thing...in my opinion...is that its BYOB!! there are several restaurants around Houston that will let you bring your own wine in but they charge a $5-$15 "corking fee." (for those that dont know what a corking fee is-its when they charge you to open your bottle and use their glasses and drink your own wine...sort of like they are punishing you monetarily for not buying their wine) anywho....they dont charge a corking fee. so we brought a bottle of my favorite red "Cupcake Cabernet Sauvignon" and my friend brough a yummy Pinot Grigio named "Italo Cescon." We didnt finish the bottles...we had to drive afterwards...but it made for a fun evening. Here are a couple pics i thought id share.


if you want a laid back itallian cafe vibe for dinner i would recommend it. the pasta and pizza was really good...good prices...wait staff was nice and not pushy.

i will have a Friday DIY up tomorrow....stay tuned kids.

Wednesday, July 21, 2010

im diggin the new Black Keys Album

here is the video for the new Black Keys album.....i love this duo....plus this video is funny.


enjoy

xo
-e

Tuesday, July 20, 2010

30 day Shake Weight Challenge - Week 1

i know what your thinking....the Shake Weight..the silly wiggling dumbbell thing on tv? o yes thats exactly what i mean. i have always been a sucker for watching infomercials in the middle of the night...thanks in part to my seasonal insomnia issues. When i saw it at the Target i had to buy it. i was kinda ashamed to admit to anyone that i had bought it...so it stayed hidden and unused in my closet for a couple of months.


how is thing supposed to help get my doughy arms into shape if its hidden in a closet? it doesnt. i wish just owning workout equipment meant that i was in shape...but sadly it doesnt. in order to keep myself accountable and follow through with this challenge i am going to post some embarrassing flabby arm photos....eww im cringing just thinking about it (please excuse my camera in the mirror pic...i didnt have anyone home last night to take pics for me)


the shake weight workout is only 6 minutes a day...easy right? i started on monday (although im just now getting a chance to post the pics) and i will post pics on my weeks progress every monday for the next 4 weeks. hopefully i will actually see results in 4 weeks. its not as easy as it looks...after a couple of minutes you can really feel the burn. has anyone else used the Shake Weight? how did you do with it?

xo
-e

recent cakes

i thought i would share some cakes that i have done recently. these pics havent even made it on to my cake website....so ya'll are special.

new flavor: s'mores cupcake (still needs some tweaking but its good!)

piano cake (i mentioned it in an earlier post but never posted the pic)

circus tent cake - it matched the invitation to a T (birthday cake)

Adam (my friends adorable baby) eatting "his messy" cake...he went to town on it

Adam's Birthday Cake

castle cake

baby shower cake

cupcakes for my company's family picnic


i have a baby shower cake to do this weekend. ill post a pic when it's finished. if you feel like spreading the word...im always looking for new clients.

xo
-e

Monday, July 19, 2010

gloomy monday

its been raining a lot in houston these past few weeks. im not complaining because the rain keeps the heat in check...but it makes everyone feel down and gloomy. today at work it feels like everyone is suffering from Eeyore syndrome. the rain is also keeping me from painting and doing house remodel stuff....if its too humid nothing dries. o and dont even get me started on the mosquito nests that flourish in stagnate water.


(source)
how is your monday so far?

xo
-e

Sunday, July 18, 2010

girl with a dragon tattoo

ive had several friends tell me about this book turned movie called "the girl with a dragon tattoo." i wanted to read the book before i saw the movie...cause the book is always better....but when i saw the movie had been added to the netflix for wii i decided to watch it tonight.

it was great! it was a bit graphic and sadistic but still a good movie. i still want to read the book but i think the book will be harder to read than watching it. who knows...ill add it to my long list of things to read.


Noomi Rapace is the actress in the movie....does anyone else thinks she looks like Kat Von D from LA Ink? its uncanny...i had to do a double take at the end of the movie. there are a couple of shots at the end where she has blonde hair....and i could have sworn it was Kat. but im pretty sure she cant speak sweedish.

anywho...goodnite!!

xo
-e

Friday, July 16, 2010

friday DIY: Magazine File

i didnt plan on doing 2 DIY posts today but i was looking around the interwebz and found this DIY on www.re-nest.com


What You Need
Materials Empty cereal box, ruler, pen, scissors, decorative paper, mod podge

Instructions
1. Eat a large box of cereal. Of course, you don't have to do this all at once but I promise not to judge if you do. I used a 35 oz. box of cereal, which is the perfect size for these titles but is too small for others, like Dwell and Martha Stewart.

2. With a ruler, measure and mark a diagonal line on the front and back of the box. Also mark a line on the side of the box connecting the two diagonal lines. A clear craft ruler is a great tool for this step.

3. Cut off the top and the area you marked on the box in step #2. I used scissors for this but you could also use an x-acto knife or blade.

4. Cover the magazine file with paper. I used mod podge to glue wrapping paper to my file. Then, after the box was covered in paper, I slathered a layer of mod podge on the entire thing, giving it a little extra strength.

5. After the mod podge has dried, fill your new file box with magazines!

super useful Re-Nest....thanks!!!


xo
-e

friday DIY: feather hair strings

i thought it would be fun to start a regular weekly DIY project...this week it lands on friday. we'll see how long i can keep this up.

in college i had some feathered earrings that i wore alot. they had these long feathers that peaked out from underneath my hair...i loved them. i have always been in love with the hippie/boho/natural styles...my mom used to tell me i was born in the wrong generation. so after looking through some favorite blogs i stumbled upon a tutorial on Elsie's blog and some other feather hair accessories on MuchoMuchBuenoBueno (which coincidentally is a good friend of my friend Sara Van Buskirk-small world huh). so being inspired i decided to make some "feather hair strings"...thats what i call them anyway.

so here we go....DIY Feather Hair Strings:

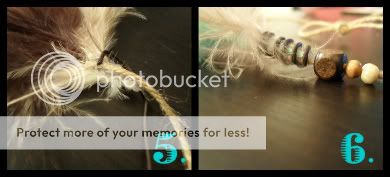
What you will need (from left to right): 1.) hot glue gun 2.)twine, leather cord, suede straps(on far right of pic) 3.) assortment of feathers (colored or patterned) 4.) hair clip (the one in the pic is used to sew hair extensions to, but you can use any kind that works well with your hair) 5.) beads (i used wooden beads...make sure the bead hole is big enough for your twine/leather cord)

im a big fan of using stuff you have laying around the house...but if you do need to buy supplies your in luck. everything all together was $10 or less and can make several dozen of these things....or something else fun.


Step 1: measure and cut a piece of twine/leather cord/suede straps. i held my string at the part in my hair and measured how long i wanted it. If you want two strands, double the length of your string and add 2 inches(to allow for the loop/knot). Fold your string in half (or almost half - i wanted mine different lengths) and tie a knot about an inch down - this will leave a loop at the top

Step 2: string on your beads in reverse order (the first bead you string on will be the bead on top once your done)


Step 3: pick out 2 or three feathers and glue them together. i just put a small line of hot glue on the top of each feather until i was happy with the number and arrangement of the feathers. if you dont like it no worries...they come apart pretty easily...just pull apart and re-glue til you are happy.

Step 4: on the back side of the feather cluster put a small line of glue and attached the end of one of your Hair Strings. I glued about an inch of string onto the feather cluster.


Step 5: put a small dot of glue at the base of the string/feather cluster and attach the end of your small leather cord. allow to dry before you glue and wrap

Step 6: once the end of the cord is dry and secure put a small line of glue all the way up the rest of the feather/string joint. quickly wrap leather cord around....the glue will hold the leather wrap in place.


Step 7: when everything is dry and set arrange your beads wherever you want them. Repeat steps 1-6 if you are doing a double Hair String.

Step 8: clip into hair and enjoy! (i used a snap clip - slipped the loop onto the clip and clipped it into my hair). You can also glue the Hair String to a "weft" clip (shown in supply pic)...whatever you prefer.


These Feather Hair Strings are cute for summer outfits and make great gifts. Hope you enjoyed today's DIY. If you have questions let me know!

xo
-e

Thursday, July 15, 2010

knitta please

i am a beginner knitta-tagger. what does this mean you say? well knit tagging is a form of graffiti or street art. the cool thing about it is that its not destructive!! its all about adding a splash of whimsy and color to an otherwise dull public environment...to make people stop, look and maybe crack a smile. knitted pieces are sewn onto street signs, trashcans, bikes, lamp posts, cars...etc. to me its just plain fun. i love seeing peoples reactions when they see something that draws their attention away from whatever they were doing.

here is an example....this was done by my mom and aunt


the knitta tags that i usually do are much smaller. i call them antenna sweaters

i carry several in my purse and whenever im in a parking lot or parking garage i slip them onto the few cars that still have antennas...you'd me amazed at how many cars dont have antennas anymore...sad face.

i cant take credit for this awesome idea. the mother of this phenomenon is Magda Sayeg of Knitta Please (also look her up on facebook - tons more pics). she is a self made woman through and through. Magda travels the world doing both gorilla knit graffiti as well as commissioned installations. im so jealous.

i am not great at knitting with needles so i use knitting looms...it makes it go alot faster...atleast for me. my stock pile of larger knitted pieces is growing. once of these days i will throw it all in the car and tag up the town. ill post pictures of course.

maybe i should do a DIY for this....i think i will....maybe even a video!!

....stay tuned.

Tuesday, July 13, 2010

gypsy rose

....

ill run away and join a pack of gypsies!!

just kidding...i wish. i have been perusing through pictures on weheartit.com and i found several gypsy-like pictures that just seem so magical to me. I've been day dreaming all afternoon about becoming a gypsy....i think it would be fun. here are some of my favorite pics i found.


so mysterious and whimsical....i love it. anywho thats all for now


xo.
-e